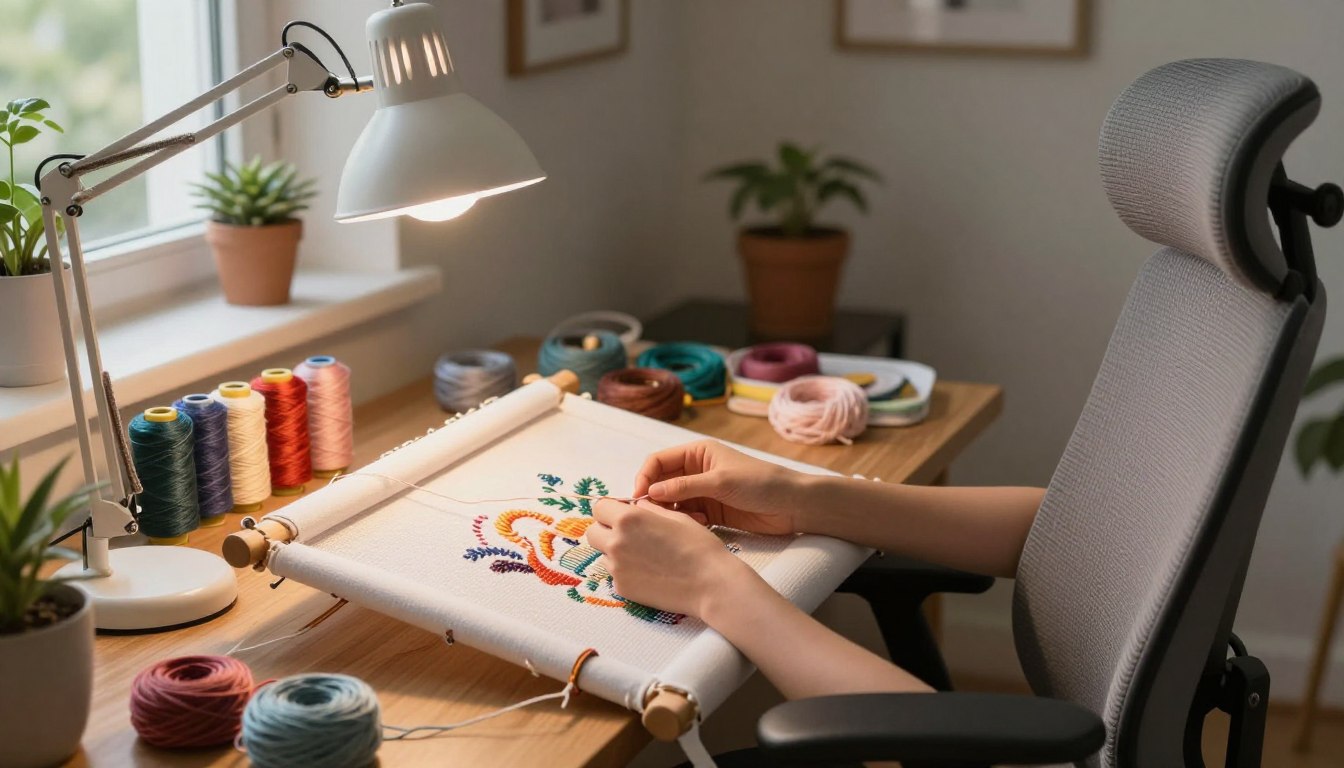
Good lighting and smart ergonomics can greatly improve your cross stitch experience. Setting up a dedicated stitching area with the right light and chair can reduce eye strain. This setup also helps maintain good posture for long stitching sessions.
LED lights with a high CRI (90+) are great for showing true colors of DMC floss and other threads. This makes color matching and small details more accurate.
Layer ambient lighting with a focused task lamp to cut shadows and glare. Magnifying lamps with goosenecks are also useful for late-night stitching without disturbing others. These choices are especially helpful for beginners, speeding up progress and protecting your eyes.
For advanced projects, planning light placement and work surface height is crucial. It helps avoid mistakes and keeps your finished pieces in top condition for framing.
A tidy workspace supports cross stitch therapy by keeping tools, threads, and inspiration within reach. Test finishes and framing early, use archival materials, and preview specialty displays like backlit panels under the final light. This helps avoid costly errors.
Key Takeaways
- Use LED task lighting with CRI 90+ to ensure true thread colors and reduce eye strain.
- Combine ambient and task lights to minimize shadows on counted cross stitch projects.
- Create a compact, organized stitching nook to boost productivity and cross stitch therapy benefits.
- Include a magnifying lamp for detailed work and late-night stitching without disturbing others.
- Plan finishing early and test materials under final display lighting to protect your work.
Why Proper Lighting Matters for Cross Stitch and Your Eyes
Good lighting changes how you work and how your finished pieces look. Daylight-balanced LEDs with a CRI of 90+ help you match DMC floss shades and avoid cross stitch mistakes. Bright, even light makes counting easier on counted cross stitch and helps you spot missed stitches in cross stitch patterns.
Layered lighting—ambient plus task—keeps shadows low and reduces squinting. Use a daylight lamp near your stitching spot and a secondary light for the room. Magnification paired with LED light, around 1.5x–3x, improves precision and lowers eye fatigue when you work on detailed cross stitch projects.
How lighting affects stitch accuracy and color matching
High-CRI LEDs render thread colors closer to reality, so your chosen DMC floss looks the same on the fabric as in the skein. Test a small swatch under your lamp before you stitch a large area. This habit cuts down on time spent fixing cross stitch mistakes and helps your palette choices shine in complex cross stitch patterns.
Reducing eye strain and fatigue during long sessions
Even, flicker-free light reduces headaches and keeps your focus steady. Position task lighting to avoid glare on Aida or linen. Take short breaks and shift distances often to rest your eyes. Stable light and a consistent routine help you enjoy cross stitch therapy without unnecessary strain.
Lighting for photographing finished pieces and displays
For cross stitch photography, adjustable LED panels or a lightbox eliminate shadows and bring out thread texture. Photograph under the same light you used while stitching to reproduce color accurately online. Use UV-protective glazing when framing finished work to preserve hues from DMC floss and keep your displays looking true over time.
| Need | Recommended Light | Benefit |
|---|---|---|
| Accurate color matching | Daylight LED, CRI 90+ | True DMC floss rendering for correct palette choices |
| Detail work | LED task lamp + 1.5x–3x magnifier | Fewer cross stitch mistakes and clearer count on patterns |
| Long sessions | Flicker-free, adjustable brightness | Reduced eye strain and sustained focus |
| Product photos | Adjustable LED panels or lightbox | Cleaner cross stitch photography and true thread colors |
| Preserving work | UV-protective glazing | Long-term color protection for displays and exhibits |
CROSS STITCH Workspace Setup: Combining Ergonomics with Lighting
Set up a cross stitch workspace that keeps you comfortable and focused. Choose a quiet nook or a portable kit if space is tight. Keep patterns, a small waste bin, and cross stitch tools within easy reach so you spend more time stitching and less time searching.

Designing a dedicated stitching nook
Pick a spot with room for pattern sheets and a project pouch. If you have a dedicated room, add shelving and display space for finished pieces. Use thread organizers and small boxes to improve cross stitch organization and keep DMC floss tidy.
Ergonomic seating and posture tips
Invest in a supportive chair with lumbar support. Try a footrest or seat cushion to reduce pressure. Change positions every 20–40 minutes to avoid stiffness and repetitive strain.
Use a lap frame or adjustable floor stand to keep fabric at a comfortable angle. These solutions free both hands, maintain even tension, and pair well with cross stitch frames when you need added stability.
Optimal table height, light placement, and hand dominance
Match table height to your seated elbow level so your shoulders stay relaxed. A wipeable tabletop helps with spills and cleanup after using beads or paints for finishing.
Place task lighting slightly behind or to the side of your dominant hand to cut shadows across the fabric. A gooseneck magnifying lamp works well for close work when you advance beyond beginner cross stitch patterns.
- Pick your nook with room for supplies.
- Layer ambient and task lights for clarity.
- Invest in a good chair and a lap/frame solution.
- Organize floss and cross stitch tools within arm’s reach.
- Plan finishing early so cross stitch frames and neat backs match your display plans.
Best Lighting Tools and Magnification for Cross Stitch Techniques
Good lighting and the right magnifier change your counted cross stitch game. Choose daylight-balanced LEDs with high CRI for true colors and less eye strain. Floor/table combos offer steady light for big projects. Clamp-base lamps fit tight spots and are great for travel.
Opt for modest magnification to keep the big picture in view while focusing on details. A 1.5x–3x lens is usually perfect for most projects. It lets you see stitches clearly without losing the pattern’s context. Higher magnification can make following long patterns and stitching slower.
LED magnifying lamps and top recommended models
The Brightech LightView Pro has a 2.25X lens and a flexible gooseneck. It’s great for hoop work and frames. OttLite’s 2-in-1 LED Magnifier has a 2X lens and a 4X spot viewer. It works as a floor or table lamp for big projects. Buying from well-known brands ensures stable lighting and reliable color accuracy.
Portable, hands-free, and specialty lighting options
Headlamps and neck lights are perfect for stitching late without disturbing others. Portable LED magnifying glasses are great for crafters. They have bright LEDs, small lenses, and magnetic or detachable bases for hoops. Clamp lights and tripod-mounted panels give even light for photos of finished pieces.
When and how to use magnification
Use a magnifying lamp for tasks like counting tiny threads, aligning backstitching, or checking color blends. Choose a lamp with an adjustable gooseneck for easy light and lens movement. For centering and hoop placement, use crosshair-style alignment tools to find the exact middle.
- Pick a magnifying lamp that fits your workspace: clamp for small desks, floor for larger tables.
- Match magnification to the task: modest power for general stitching, higher power for detail checks.
- Test lighting plus magnification on one section before committing to an entire counted cross stitch piece.
Ergonomic Techniques, Tools, and Habits to Prevent Injury
Start with small, practical changes to protect your body and progress. Use the 20-20-20 rule: every 20 minutes, look at something 20 feet away for 20 seconds. Pair that with scheduled short breaks and simple stretches to cut eye strain and shoulder tension. Daylight LEDs and handheld magnifiers help you keep sessions longer without adding fatigue.

Break big projects into manageable sections and set milestones you can hit in one sitting. A visual tracker or photo log keeps momentum and prevents marathon stitching that leads to common cross stitch mistakes. Alternate detailed patterns with easier rows to pace yourself and protect wrists from repetitive motion.
Short breaks, pacing, and cross stitch therapy benefits
Short, frequent breaks work better than rare, long rests. Use a timer to enforce breaks and to remind you to change posture. Pacing reduces mental fatigue and turns stitching into restorative cross stitch therapy instead of strain. Community stitching groups offer accountability and tips for healthier cross stitch habits.
Tools that reduce strain: needles, frames, and stands
Choose ergonomic needles and lighter hoops to cut hand tension. Longer-handled needles and padded grips lower repetitive reaching and improve control. Adjustable stands, padded lap frames, and stretcher bars free your hands and stabilize tension for neater stitching with less effort.
Adapting for chronic conditions and accessibility
If you manage arthritis or low vision, adapt with magnifiers, frequent breaks, and supportive seating. Test changes on a small project before committing to a large piece. Use magnetic needle minders, needle threaders, and easy-access storage to limit repetitive searching and conserve energy.
Below is a quick comparison of practical tools and habits you can try. Each entry lists the benefit and one tip for testing it on a small project.
| Tool or Habit | Main Benefit | Quick Test Tip |
|---|---|---|
| Ergonomic needles | Reduce hand cramping and improve grip | Use for a 30-minute session and note comfort changes |
| Daylight LED magnifier | Less eye strain, more accurate color matching | Compare identical stitches with and without the lamp |
| Adjustable stand or hoop | Frees hands, evens tension, reduces shoulder use | Try on one block of pattern and assess posture |
| Padded lap frame | Comfort during long sitting, stable stitching | Use during a simple motif to test fatigue |
| Timer with 20-20-20 rule | Prevents eye strain and enforces breaks | Set for 20-minute intervals for two days |
| Visual project tracker | Prevents overwork and reduces cross stitch mistakes | Mark completed sections on a printed chart |
| Needle minders and magnetic clips | Minimize drops and repetitive reaching | Use during thread changes to measure time saved |
| Community or support group | Offers tips, emotional support, accessible hacks | Join one online and try a shared mini-challenge |
Lighting and Ergonomics for Special Projects and Finishing
When you move from stitching to finishing, lighting and ergonomics are key. Test fabrics and threads under the final display light to avoid surprises. Keep a notes file with DMC floss numbers, fabric counts, and any adhesives you tried. This makes future repairs go smoothly.
Backlit panels and lampshade projects
For backlit panels or lampshade cross stitch, choose opaque or double-layered fabrics. Stitch lighter backstitching techniques where outlines will face illumination to prevent harsh shadows. Tidy the reverse: weave ends securely and trim close so bumps do not show when lit.
Use heat-resistant adhesives and add an inner liner for lamp safety. Test small swatches under the intended backlight before committing to a full piece.
Framing, mounting, and preservation
Avoid non-archival shortcuts like diluted PVA or gluing directly to MDF. Pick archival materials, acid-free mats, and UV-protective glazing for long-term color stability. When adhesives are needed, test them on scraps to check for staining or stiffening.
For lost margins or weak edges, sew calico extensions before mounting. Use lacing to boards for steady tension and gentle washing only if dyes are stable. Record the exact framing method and fabrics so restorers can follow your choices later.
Photography, display lighting, and online presentation
Use soft, even LED panels and adjustable tripods to remove shadows and show true colors in cross stitch photography. Photograph work in consistent light to preserve accurate color rendition of DMC floss and fabric tones across galleries.
Document milestones and snapshots of your workspace setup to track lighting or ergonomic changes. This helps you reproduce a display or troubleshoot when showing work at fairs, shops, or online platforms.
| Task | Recommended Practice | Why it matters |
|---|---|---|
| Backlit sample testing | Stitch small swatch, test under final lamp | Prevents harsh outlines and visible backing issues |
| Lampshade assembly | Use heat-resistant adhesive and inner liner | Reduces fire risk and prevents adhesive darkening |
| Finishing for framing cross stitch | Use acid-free mats, archival adhesives, UV glass | Protects fibers and colors from acid damage and sun |
| Edge repair | Sew calico extensions or reinforce with backing | Maintains margin for stretching and framing |
| Photography setup | Soft LED panels, tripod, consistent color temp | Accurate cross stitch photography that matches real colors |
| Preservation checklist | Test adhesives, choose archival materials, record DMC floss | Makes future repair and conservation straightforward |
Conclusion
To enjoy your cross stitch more, start with good lighting and magnification. Use a daylight-balanced LED with CRI 90+ and add extra lighting. This makes colors and small stitches clear. An adjustable magnifying lamp makes long hours comfortable and precise.
Your workspace is key. Create a dedicated area with good seating, easy access to floss, and smart storage. This helps both new and experienced stitchers. Good organization keeps tools handy, cuts down on errors, and keeps the craft relaxing.
Think about finishing and framing early, especially for special pieces. Use materials that last, test adhesives, and plan scale and mounting early. This saves time and prevents damage for items like lampshades or big projects.
Next steps: get a high-CRI daylight lamp, add extra lights, and invest in a comfy chair and magnifier. Follow the 20-20-20 rule, keep things organized, and use lasting finishing materials. These steps will make your stitching more comfortable, accurate, and long-lasting.
FAQ
Why is proper lighting important for cross stitch and my eyes?
What is layered lighting and how do I set it up for stitching?
Which LED and magnifying lamp features should I look for?
How can I test color accuracy before and after I stitch?
What are practical magnification and portable lighting options for small spaces or travel?
How should I organize my stitching workspace to stay efficient and safe?
What ergonomic seating and posture tips reduce strain during long stitching sessions?
How often should I take breaks and what routines help prevent eye fatigue?
What tools reduce repetitive strain and help if I have chronic conditions or low vision?
How do lighting and magnification affect photography of finished pieces?
Are there special lighting considerations for backlit pieces or lampshades?
What framing and finishing practices preserve my work long-term?
How should I plan finishing for wearable or unconventional projects like wood or metal mounts?
What immediate steps can I take to improve my stitching setup today?
This post contains affiliate links. If you click on a link and make a purchase, I may earn a small commission — at no extra cost to you. Thank you for supporting this blog and helping me keep the patterns free! Read the full Affiliate Disclosure & Transparency.